
I love making this coconut whipped coffee at home. It’s just like those fancy drinks from coffee shops, but so much cheaper and easier to make. The first time I tried it, I couldn’t believe I made something this good in my own kitchen.
The best thing about this recipe is how simple it is. You just need instant coffee, some dairy-free cream, and a few other basic ingredients. The coconut sugar makes it taste amazing – better than regular sugar. And since it’s dairy-free, it won’t make you feel heavy or bloated.
It’s fun to watch the coffee mixture turn into this fluffy, cloud-like topping. Even if you’ve never made fancy coffee drinks before, you can totally do this.
Don’t worry if it’s not perfect the first time. Just keep whipping the coffee mixture and it will work. Let me show you how to make it!

Why You’ll Love This Recipe
- Light and refreshing yet indulgent
- Dairy-free and customizable
- Instagram-worthy presentation
- Perfect balance of coffee and sweetness
- Can be made hot or cold
- No special barista skills required
- Ready in just minutes
Quick Facts
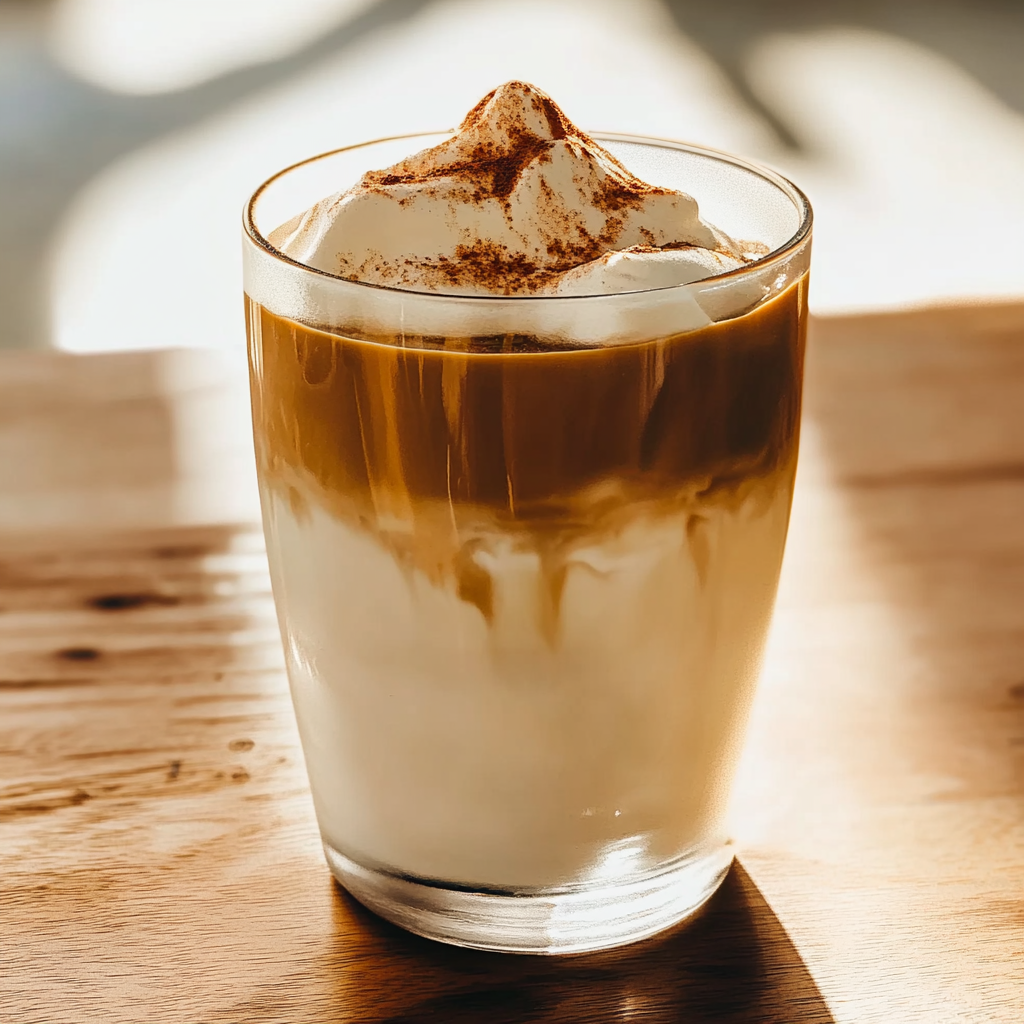
Coconut Whipped Coffee is a delicious dairy-free twist on whipped coffee (also known as Dalgona coffee). It’s a two-layer drink: the bottom layer is cold milk or coconut water with ice, and the top layer is a fluffy, creamy whipped coffee mixture made with instant coffee, coconut sugar, and dairy-free cream.
- Prep Time: 10 minutes
- Total Time: 12 minutes
- Servings: 1 large drink
- Calories: 145 kcal
- Difficulty Level: Easy
- Dietary: Dairy-Free, Vegan-Optional
Equipment Needed

- Electric hand mixer or whisk (for creating the perfect fluffy texture)
- Medium mixing bowl (preferably stainless steel for better whipping)
- Measuring spoons and cups (for precise ingredient portions)
- Tall glass (16 oz recommended for proper layering)
- Long spoon (for stirring and layering)
- Ice cube tray (if serving cold)
Ingredients

For the Whipped Coffee Layer:
- 1 tablespoon instant coffee (premium quality recommended)
- 30 ml non-dairy cream
- 1 tablespoon coconut sugar
- 1 tablespoon oat milk
For the Base:
- 3/4 cup milk of choice (or coconut water)
- Ice cubes (if serving cold)
For Garnish:
- Cocoa powder
- Optional: coconut flakes, cinnamon, or coffee beans
How To Make
1. First, gather everything you need: instant coffee, non-dairy cream, coconut sugar, oat milk, ice cubes, your choice of milk or coconut water for the base, and some cocoa powder for topping. Make sure you have a mixing bowl, hand mixer (or whisk), measuring spoons, and a tall glass ready.

2. Start by putting 1 tablespoon of instant coffee into your mixing bowl. Add 30 ml of non-dairy cream, 1 tablespoon of coconut sugar, and 1 tablespoon of oat milk to the same bowl.

3. Turn on your hand mixer and start whipping these ingredients together. If you’re using a whisk, you’ll need to whip by hand. Keep mixing until the color gets lighter and the mixture becomes very fluffy – like a thick cloud. This usually takes about 7-8 minutes with a hand mixer or 10-12 minutes if you’re whisking by hand. You’ll know it’s ready when it holds its shape and forms stiff peaks when you lift the mixer.

4. While you’re waiting for your coffee mixture to get fluffy, fill your tall glass with ice cubes. Pour about 3/4 cup of your chosen milk (or coconut water if you prefer) over the ice.

5. Once your coffee mixture is nice and fluffy, use a spoon to carefully place it on top of your iced milk. Try to make it look like a cloud sitting on top of the milk. Don’t worry if it’s not perfect – it will still taste great!

Finally, dust a little cocoa powder over the top of your whipped coffee. You can use a small strainer or just sprinkle it with your fingers.
Your drink is now ready to serve! You can either stir it all together before drinking or leave it layered and let it mix as you drink. Both ways are delicious!
Remember: If your mixture isn’t getting fluffy enough, just keep whipping. Sometimes it takes a little longer, but it will work. Also, make sure to serve it right away for the best taste and texture.

Pro Tips
- Use cold equipment for faster whipping
- Choose high-quality instant coffee for the best flavor
- Whip until the mixture turns a light caramel color for optimal texture
- Create a slight dome effect when layering for that professional look
- Chill your glass beforehand for an extra-refreshing drink
Ingredient Alternatives
- Instant Coffee: Instant espresso powder for stronger flavor
- Non-dairy Cream: Coconut cream, almond cream, or regular heavy cream
- Coconut Sugar: Brown sugar, maple syrup, or monk fruit sweetener
- Oat Milk: Any plant-based milk or regular milk
- Base Liquid: Experiment with almond milk, coconut water, or regular milk
Variations
- Mocha Coconut
- Add 1 teaspoon cocoa powder to the whipped mixture
- Vanilla Bean
- Include 1/4 teaspoon vanilla bean paste
- Spiced Coconut
- Add 1/4 teaspoon cinnamon and a pinch of cardamom
- Caramel Coconut
- Drizzle with dairy-free caramel sauce
Serving Suggestions
- Serve immediately while the whipped coffee is fluffy
- Pair with:
- Fresh pastries or croissants
- Coconut macaroons
- Fresh fruit
- Toast with nut butter
- Present in a clear glass to showcase the layers
Storage
- Whipped mixture can be stored in an airtight container for up to 24 hours
- Re-whip briefly before using if stored
- Best served fresh for optimal texture and presentation
Troubleshooting
Mixture Won’t Whip:
- Ensure all ingredients are precisely measured
- Check if your instant coffee is fresh
- Try a different brand of instant coffee
- Make sure your bowl is completely dry
Layers Mixing Too Quickly:
- Ensure your whipped mixture is stiff enough
- Pour base liquid gently
- Layer carefully using the back of a spoon
- Use properly chilled ingredients
Frequently Asked Questions
Q: Can I make this without instant coffee? A: Regular ground coffee won’t work for this recipe. Instant coffee is essential for achieving the right texture.
Q: How long does it take to whip the coffee mixture? A: Usually 7-8 minutes with an electric mixer, or 10-12 minutes by hand.
Q: Can I make this ahead of time? A: The whipped mixture can be made up to 24 hours ahead, but the drink is best assembled just before serving.
Q: Is this recipe keto-friendly? A: Replace the coconut sugar with a keto-friendly sweetener and use unsweetened milk alternatives to make it keto-compatible.

And there you have it, your very own coconut whipped coffee! The first time I made this, I couldn’t believe how easy it was to create something that looks so fancy right in my kitchen.
If you try this recipe, I’d love to see how it turns out! Leave a comment below to let me know what you think. Did you try it with coconut water? Add your own twist? I always enjoy hearing about your kitchen adventures!
Remember, the key to perfect whipped coffee is patience while mixing – those few extra minutes of whipping make all the difference.
Recipe Card

Coconut Whipped Coffee (Dairy-Free)
Ingredients
For the Whipped Coffee Layer:
- 1 tablespoon instant coffee premium quality recommended
- 30 ml non-dairy cream
- 1 tablespoon coconut sugar
- 1 tablespoon oat milk
For the Base:
- 3/4 cup milk of choice or coconut water
- Ice cubes if serving cold
For Garnish:
- Cocoa powder
- Optional: coconut flakes cinnamon, or coffee beans
Instructions
- First, gather everything you need: instant coffee, non-dairy cream, coconut sugar, oat milk, ice cubes, your choice of milk or coconut water for the base, and some cocoa powder for topping. Make sure you have a mixing bowl, hand mixer (or whisk), measuring spoons, and a tall glass ready.
- Start by putting 1 tablespoon of instant coffee into your mixing bowl. Add 30 ml of non-dairy cream, 1 tablespoon of coconut sugar, and 1 tablespoon of oat milk to the same bowl.
- Turn on your hand mixer and start whipping these ingredients together. If you’re using a whisk, you’ll need to whip by hand. Keep mixing until the color gets lighter and the mixture becomes very fluffy – like a thick cloud. This usually takes about 7-8 minutes with a hand mixer or 10-12 minutes if you’re whisking by hand. You’ll know it’s ready when it holds its shape and forms stiff peaks when you lift the mixer.
- While you’re waiting for your coffee mixture to get fluffy, fill your tall glass with ice cubes. Pour about 3/4 cup of your chosen milk (or coconut water if you prefer) over the ice.
- Once your coffee mixture is nice and fluffy, use a spoon to carefully place it on top of your iced milk. Try to make it look like a cloud sitting on top of the milk. Don’t worry if it’s not perfect – it will still taste great!
- Finally, dust a little cocoa powder over the top of your whipped coffee. You can use a small strainer or just sprinkle it with your fingers.
- Your drink is now ready to serve! You can either stir it all together before drinking or leave it layered and let it mix as you drink. Both ways are delicious!
- Remember: If your mixture isn’t getting fluffy enough, just keep whipping. Sometimes it takes a little longer, but it will work. Also, make sure to serve it right away for the best taste and texture.